


Check out new information on resizing images added March 26, 2013
Size matters when you are creating web pages. The larger the file, the longer it takes for the page to download and become visible for your viewers. Text on web pages does not take up much space, but oh those images!
Gone is the day when we struggle to capture and print large images. Now our digital cameras capture images in Mega Pixels (around 5 to 12 million pixels). That means we are capturing a lot of information for that image. A lot of information translates into a very large file. You want to print that photo as an 8 x 10? No problem. Things are different when you want to add an image to a web page, however. When we want to add an image to a web page we have to think about the pixel size of the image and it helps to know a bit about monitors and their screen resolution.
Monitor Resolution
For a long time, a majority of our monitors had a resolution of 800 x 600, and some still have that resolution. Then we started getting better and larger monitors and a majority of those screens moved up to 1024 x 768. Now some of our monitors have a screen resolution of 1920 x 1080.
But what do those numbers mean to us? They are the number of pixels that are displayed on the screen. For example 1024 x 786 means that we can see 1024 pixels across the screen and 768 pixels from top to bottom of the screen. Pixels are little squares of color that make up your pictures. Looking at a digital image from a camera (my Cannon PowerShot for example) shows an image of 3264 x 2448. If our monitor can only show 1024 x 768, you can see the problem. We will not see the whole image unless we scroll both up and down as well as side to side. It will take up a lot of file space and not be totally visible on the monitor.
Solving the Problem
What do we do to prevent that? We want our viewers to see a nice picture but we don’t want to take up a lot of space either in the file or on screen.
WordPress actually helps us with this. When we upload an image it will create different sized versions of the image. However this is only half of the solution. We will have a well-sized image for our web page, but we have also uploaded the full size image which means we uploaded that huge file that will be taking up valuable file space in our web site.
But, there are a few things we can do to prevent that space hog:
- Crop out any unnecessary stuff
- Save the image properly
- Don’t upload more than you need
- Don’t upload the image more than once
Crop
If you have a lot of empty space or unnecessary parts in the image it takes up space in the file. We want to make sure we are only using the part of the picture that is important. This would entail cropping the image so we cut out all the unnecessary parts. This can be done in many image editing programs, for some examples:
- Adobe Photoshop (needs to be purchased)
- Irfanview, Gimp, and Picasa which are open source programs (free)
- Microsoft’s Picture Manager comes with Microsoft Office
If your image is not opening with the program you want automatically, right click on the image and use the Open With option, choosing the program you want to use.
Save the image properly
The first part of that is to determine what kind of image file we will use.
- A small image with few colors – a .gif file may be the best choice. Gif can also hold transparency.
- An image with many colors as in a photograph – a .jpeg file type would be best. No transparency.
- A third choice would be a .png file which can – preserve many colors as well as some transparency. This may be a larger file, so try the other two first.
Then you want to save the file. If it is available, you can choose an option called Optimize for the Web. This will take your image and literally cut down the amount of pixels in your image. It does not change what you see in the image. For example I had an image of a group of people that was 13MB (13,594,501bytes). I saved it for Web and it is now 184 kb (188,416bytes). I have not lost any part of the image and it is still a good size image on screen. And if I crop out the blank wall space I can shrink it down even more to 103KB (106,496 bytes).
Another example is the images below. They are two versions of the same image:

The original on the left is 2832px x 1888px. You are seeing this at 25%. That means you are only seeing 25% of the pixels that make up this image. You would not be able to see the image at 100% on one screen.
I cropped some of the extra ground out and then resized. The image on the right is the result and it is 760px x 485px. This image is being viewed at 100%. (These are not true to scale – I have resized the images to fit in this post)
Upload only what you need.
The largest image we use on our pages is less than 1000 pixels wide. So uploading an image that is 6000 pixels wide is truly overkill. This goes along with saving the image in the right format and pixel size.
The programs that will crop your image will also resize your images. You can resize in Paint by using the Resize and Skew option. In older versions you would resize by using less than 100%. In the newest version for Windows 7, you can resize by % or by pixels size as shown above.
Microsoft also has an add-on called Image Resizer PowerToy which can be downloaded from this link. This adds a resizer on your images that will show up on right click.
http://download.microsoft.com/download/whistler/Install/2/WXP/EN-US/ImageResizerPowertoySetup.exe

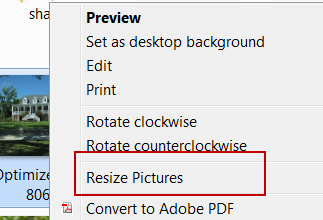
This is what you see by right clicking on an image file. Note the Resize Pictures option.
You get to choose which size you want.
Save the resized image as a new file so you don’t lose the original. You may want all those pixels to make a print.
Upload only once
One uploaded image can be used on as many pages or posts as you want. Instead of uploading from your computer once it is uploaded when adding an image choose the image from the Media Library (accessible from the left hand dashboard menu). If you have many pictures in your media library, use the Search bar to look for the specific name of the file and WordPress will return those results to you instead of the full list of available images.
Another Program to Optimize/Resize images
Since I originally wrote this article I have started using Microsoft Office Picture Manager to resize images. Most computers that have Microsoft Office have this program and it is pretty user friendly.
This tool can be found in the Microsoft Office Tools folder (from All Programs). Open your image with this program and then choose Edit Pictures. Then choose Resize.
Depending on the original size of the image and the subject of the image you can resize by a percentage or a predefined width and height. You will see the original pixel size and the new pixel size in the Size Setting Summary area as shown here.